
*All hints are included below so please scroll down slowly to avoid revealing them all at once*
**Solutions are given at the very bottom of the page**
Puzzle 1 – Water wheel

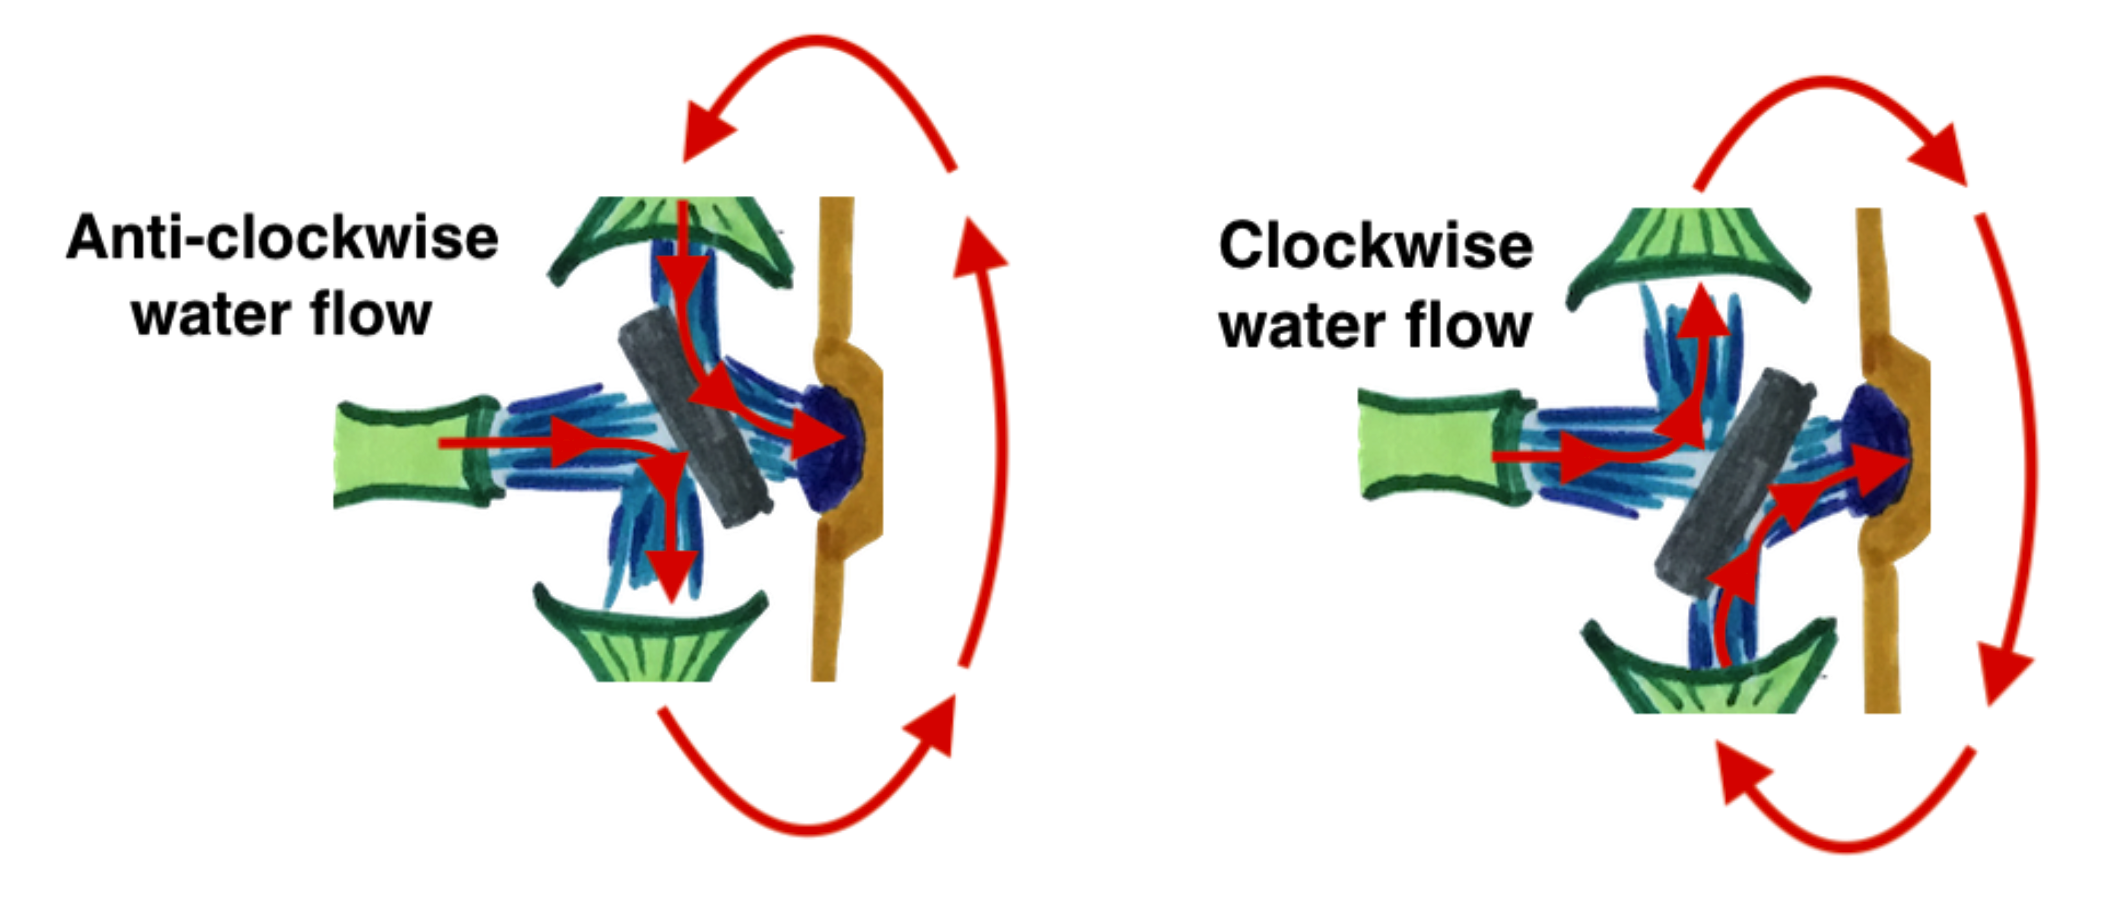
You notice the pump-like structure to the left spouting water at a constantly rotating block of stone. The water flows through bamboo pipes and over a heavy stone waterwheel before running back through some pipes and being recycled by the pump. As the stone block rotates, the flow of water is inverted, and the waterwheel begins to rotate slowly in the opposite direction. A thick stone platform follows the movement of the wheel in front of you, oscillating back and forth.
On your side of the bank are an assortment of differently shaped bamboo tubes, some splitters and even some marked with an arrow on them. You pick one up and look inside.

In order to cross the water, you will need to devise a way to ensure the waterwheel is always rotating in the same direction, no matter which way the water is flowing in. This would allow you to ride the platform all the way to the other bank, without it turning back before then.
Can you find a way of connecting the pump pipes up to the water wheel so that no matter which direction the water is flowing, the flow over the wheel is always forwards?
NOTE: The water must always flow in a complete circuit or the pump will run out of water.
Hint 1
“Now I did say I’m no plumber but maybe my days of being an electrician can help. Would it help to draw everything as a circuit diagram? You could start by connecting some pipes and diodes for the flow in one direction and then adding more for when the water flows in the other direction.”
.
.
.
*Scroll down for hint 2*
.
.
.
Hint 2
“My toucan senses tell me you can do it using 4 of the diodes, where as the input flow alternates, the water is always directed through 2 of the 4 diodes.”
.
.
.
*Scroll down for hint 3*
.
.
.
Hint 3
“Try and split both pump pipes and root them to either side of the wheel. Now add in some diodes to control the direction of flow.”
.
.
.
*Scroll down for hints to the map puzzle*
.
.
.
Puzzle 2 – Map
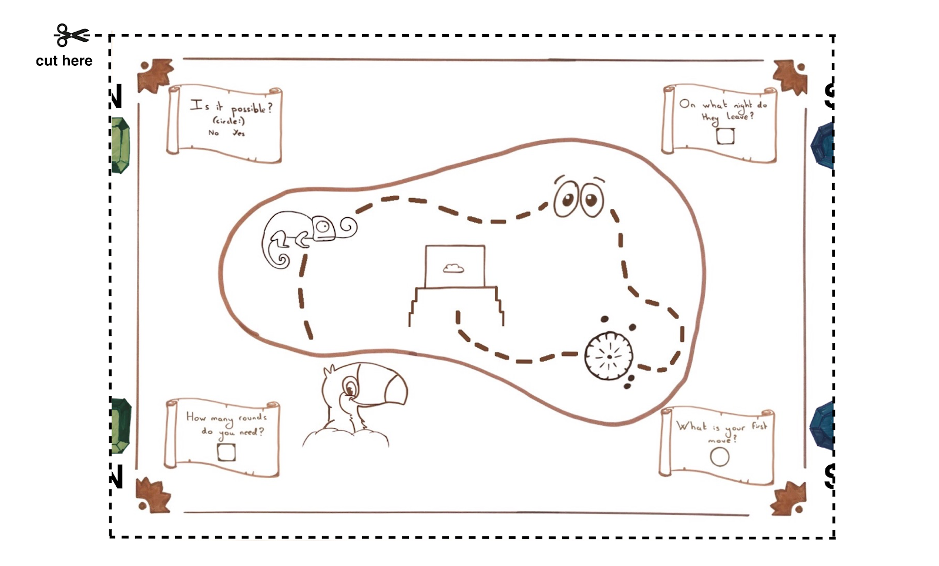
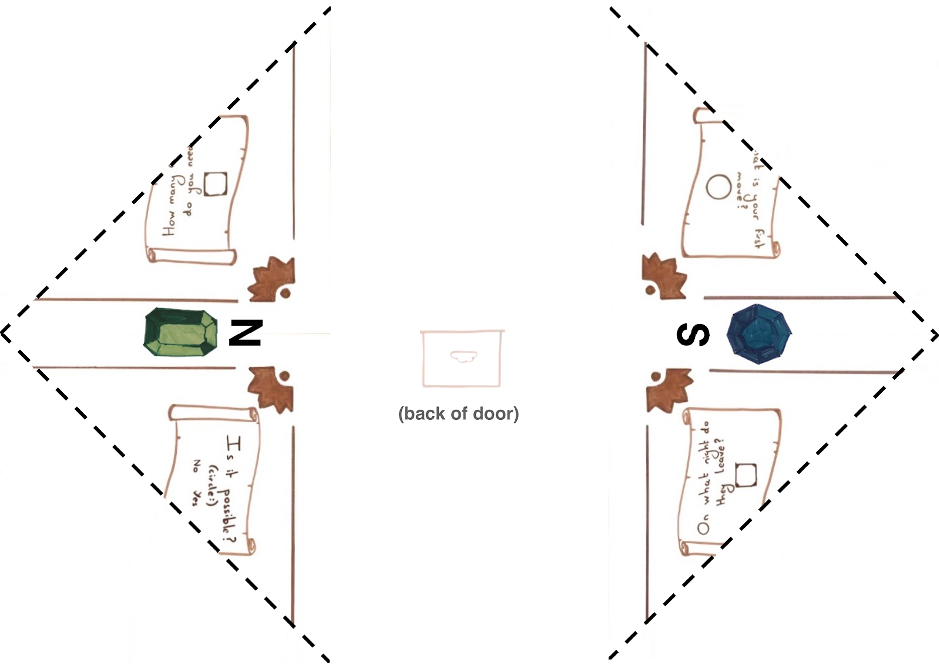
“Tell me how to orient these gears (current code reads 2-1-4) and your journey home can commence.” You search the room for clues, anything to help in cracking the last code, nothing. Hopeless, you pull out the only thing this island has given you, the map.
Can you work out what code Terry must enter to set you free? You will want to print off your own copy of the map so that you can analyse it better. You can find a printable image here. [There is no need to print in colour]
Hint 1
“Do you notice that the map seems to be incomplete around the outside? Can you manipulate the paper to join up what seems to be cut off?”
.
.
.
*Scroll down for hint 2*
.
.
.
Hint 2
“There might be a way to fold the paper so that the two halves of each gemstone are brought together. This should also bring together two halves of the letters N and S. Can you find three numbers somewhere on the map now?”
.
.
.
*Scroll down for hint 3*
.
.
.
Hint 3
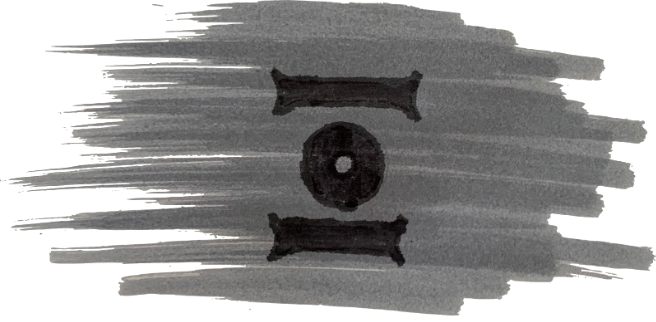
“Don’t forget to fill in the symbol on the back of the door, what types of numbers consist only of 1s and 0s?”
.
.
.
*Scroll down for solution to the water wheel puzzle*
.
.
.
Puzzle 1 (water wheel) – Solution
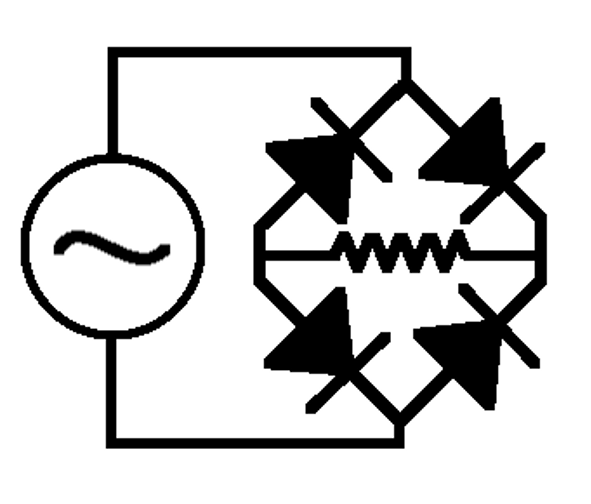
This puzzle is a convoluted way of asking “Is there an arrangement of diodes that can convert an alternating current into a direct current?”. First solved by Polish electrotechnician Karol Pollak in 1895. The solution is known as a diode bridge or rectifier and is widely used in electronics around the world. Here we will construct what could be argued as an intuitive approach and then clean it up where possible. For simplicity, we use circuit symbols.
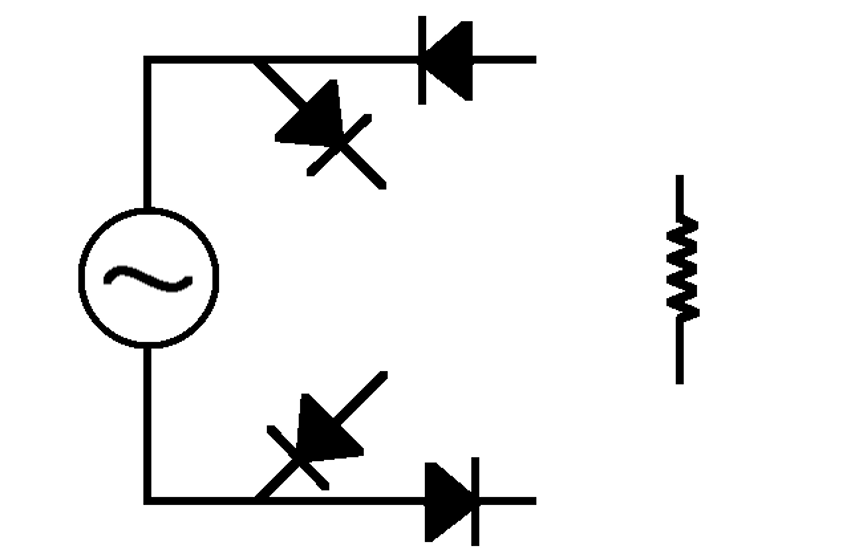
The setup is as follows:
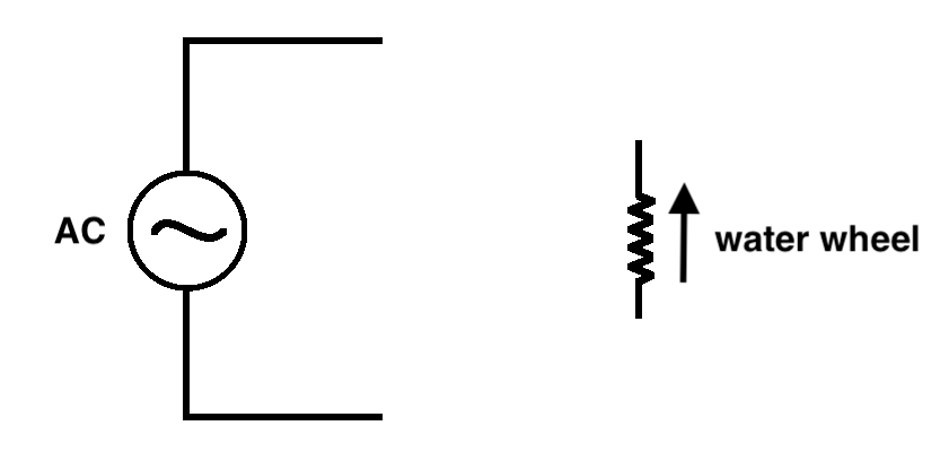
It might be useful to split up each wire with a diode coming in and a diode going out. That way we can make two circuits where each will only allow current to flow in one way.
Now the question of joining them up to the output becomes much easier. Just connect them up so that the current always flows ‘upwards’ through the wheel.
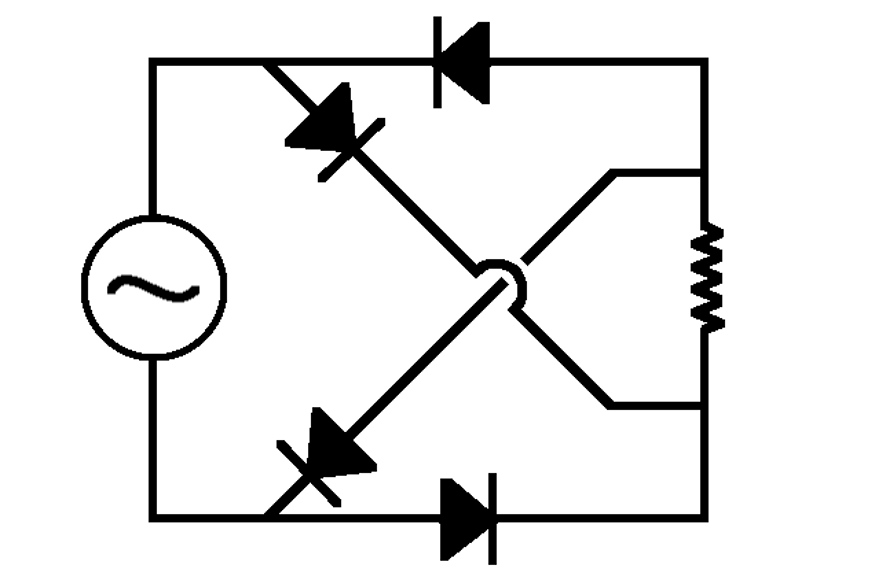
This is our final setup and a solution to the puzzle. You can clean this up considerably to reach the standardised configuration shown below. Make sure to convince yourself it actually works!
.
.
.
*Scroll down for solution to the map puzzle*
.
.
.
Puzzle 2 (map) – Solution
The final puzzle is more of a sneaky easter egg just to finish off our journey through Andolore Island so don’t worry if you didn’t spot it. The clue lies in the gemstones around the edges of the map and the answer is revealed by folding up the map in such a way as to align the gemstones. After filling in the answers to all of the puzzles, you will notice three binary numbers appear on the back of the map. The details are below and the final answer is 1, 5, 4.
The clues are half cut emerald and sapphire on the edges of the map, as well as the cut letters N and S. How could we bring the two corresponding halves to each other so that we get two fully formed gemstones? The answer is to make four mountain folds along the dashed lines as shown.
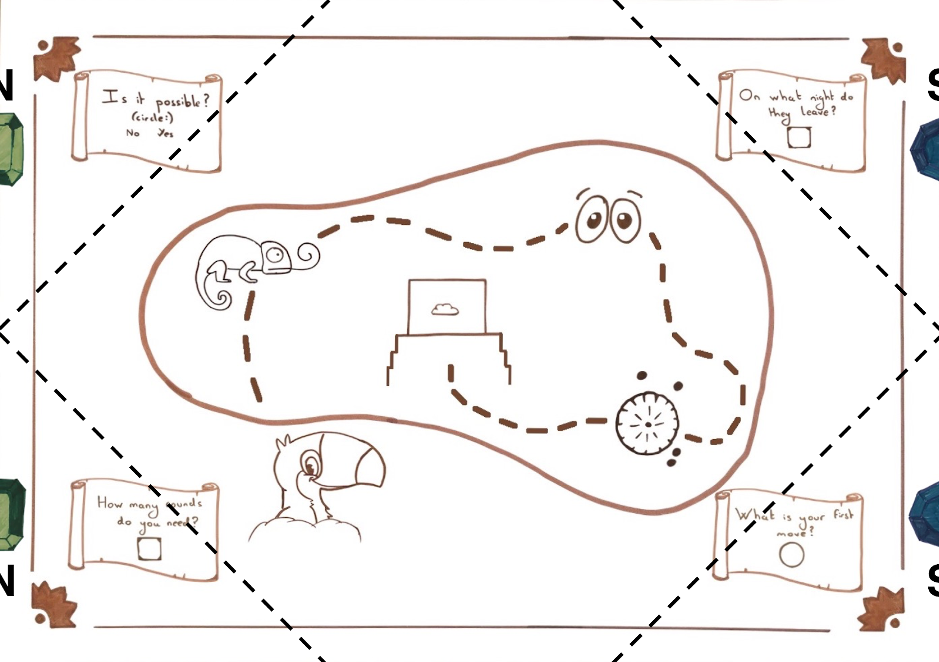
Now after doing this, turning the map over you should be looking at something which looks like this:
Now all that’s left to do is fill in the answers to all of the puzzles and mark the symbol on the back of the door. Lastly, hold the map so that the N and S are in the north and south and you should notice three, oddly spaced, binary numbers.
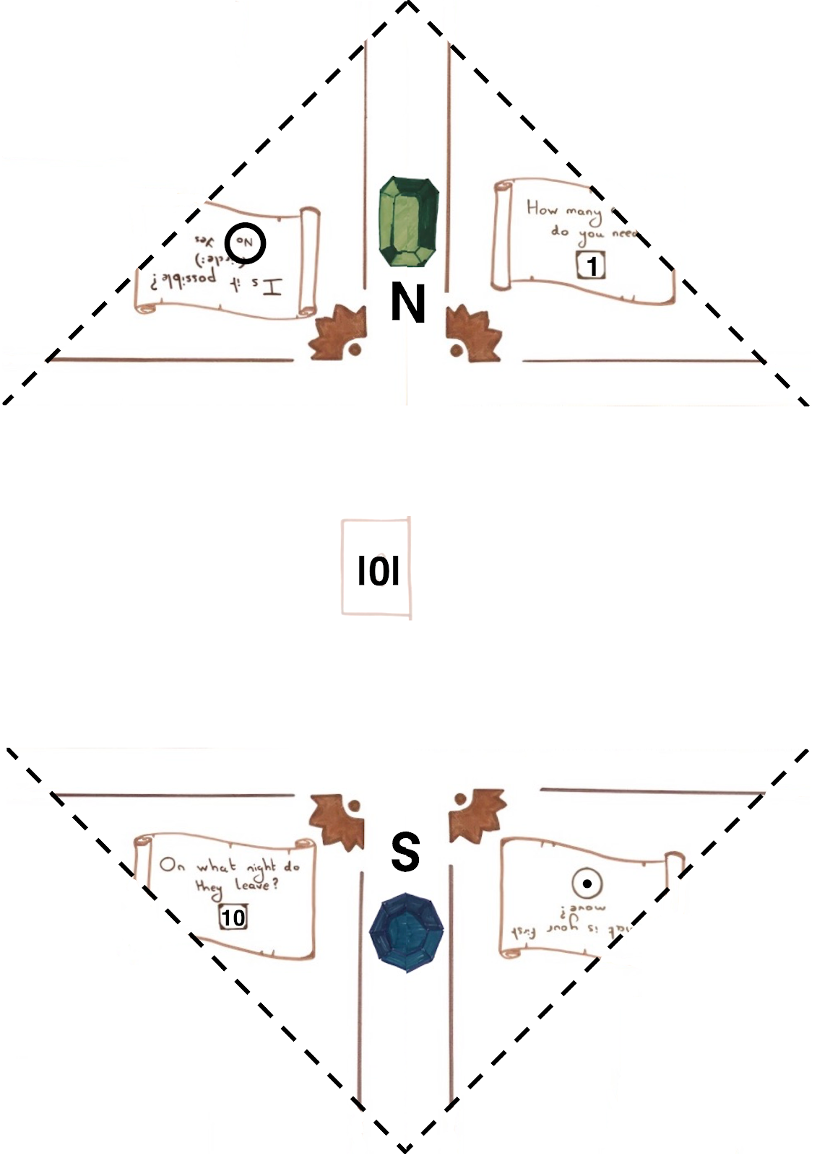
Reading from the top down, we have the numbers:
01 which is just 1 in binary,
101 which is 5 in binary,
100 which is 4 in binary.
